A couple of people have asked about the modifications I made to Mariah. I had a basic plan, which was to rip back to the top of the arm, continue with the big cable across the shoulder and over the hood, and at the same time do something to bring the neck in as it was very wide (see February 18th post).
With those general plans, I made up the specifics as I went along. I will try to give as complete details as I can, but please don’t ask me for stitch counts! First, I didn’t keep track of them, and figuring it out from the finished garment would be tedious or impossible. And second, I changed the stitch counts on the body of the sweater to accommodate my different gauge, so they would be meaningless to anyone except a person making size “somewhat bigger than large, but smaller than extra large”, and getting gauge of 4.63 SPI.
1. At the top of the arm, (don’t let this be dictated by where you are in the cable, it should be dictated by fact that the sleeve sits at the top of your arm.) you are supposed to stop the cable pattern and go back to the cable/rib pattern (as on the cuffs). Ignore this and keep knitting the big cable pattern. (My raglan measured about 6” at this point.)
2. I kept knitting, decreasing for the yoke, and doing the cable pattern, until my raglans measured 10” (measuring diagonally right up the raglan seam.)

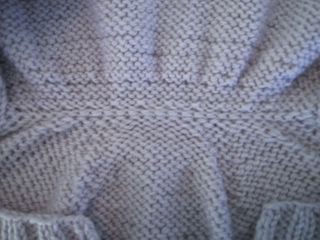
AT THE SAME TIME: What I did for the back neck. I found that when I originally made this sweater, the neck opening at the hood was too large and caused the sweater to pull to the back and just feel really loose. I made 2 darts to bring the back more securely up around my neck. When the back length measured 18” (about 2 inches below the back neck) I knit about ¼ of the way across the back, k2 tog, place marker, sl 1, k1, psso knit across until you are the same distance on the other side, and do it again. This is just like some of the shaping in the pattern for the hood. Keep doing these decreases on the right side, and purl across on the wrong side for 2 inches, and you will take away approximately 20 stitches, or about 4”. If it still feels loose when you try it on, you can bind off the back neck to give it more structure. I bound off tightly, on the wrong side row, the last row of the yoke, and knit in pattern to the end. When I was coming back across on the right side (first row of the hood), I picked the stitches back up. Instead of picking up in the first stitch below the bind off row, I just picked up one thread, the bind off thread, to make it look neater on the wrong side, where it might be seen.

Back neck from the outside
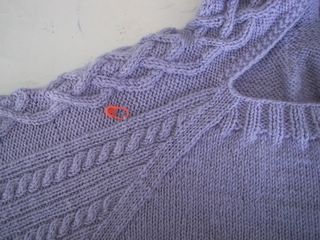
Back neck from the inside.
AT THE SAME TIME: What I did for the front neck edge. When I had completed the rows that the pattern specified for the yoke, instead of doing the garter rows, I went straight across with a 2 x 2 rib, reminiscent of the rib at the bottom, but without the cables, for about 1.25”, then bound off that portion. Again, I did this to bring the neck in a little. It would have looked a little better if I hadn’t gone on quite so long, but say la vie.
Now, the raglan measured 10”, I had bound off the front rib, bound off the back neck, it “felt right” when I tried it on, like it was ready for a hood. At this point, some major magic happened. My raglan decreases had eaten up all of the sleeve up until exactly where the reverse stockinette stitches on either side of the big cable began. So now I started the hood. I knit 1 edge stitch (slip the first stitch of every row purl-wise, and knit the last stitch of every row.) 2 garter stitches, the rev. st.st of the cable, the cable (same cable- just as it was all the way up the arm and shoulder), knit across the back hood, and the same on the other side.
If you made the “darts” on the back neck to pull the neck in, you will want to add these stitches back in over the next few rows. Basically, you will want to come close to the same number of stitches as the pattern specifies for your size on the hood, keeping in mind that adding the cable will make your hood smaller than the original, so you might want to compensate. (The hood on the original was quite roomy, so if you have slightly less stitches, I think you would be fine.)
What I did to add the stitches back in, was knit 2, make one, repeatedly across the back, on two different rows. It made it a little ruffley, and this is one thing I would do differently, but I didn’t think it was bad enough to rip it out again. I would increase out gradually, by doing something like the darts in reverse.
href='http://photos1.blogger.com/img/259/2511/320/March 8 blog Mariah modifications 0065.jpg'>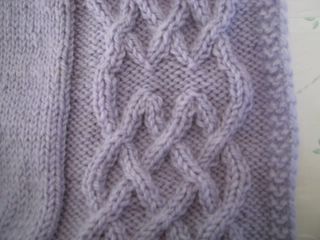
Once I was going around on the hood, it was straightforward. I ignored the lower hood shaping directions, since I did the bind off/add back in thingie, above. I just knit it straight, with the cable on each side.
The only thing at this point, is to figure out where you will end the hood and make the cable symmetrical. I just knit and knit and decided I would worry about that when I got there. The finished hood is supposed to be 14”. When I reached 10”, I measured the hood and analyzed how long a cable repeat was. I figured I would either end it at the cable break, where you do the reverse St St rows, or in the middle between the break, so there would be one full portion of the cable between the break parts, centered on the back. I figured, between those 2 possibilities, I would be able to end it within a inch plus or minus of 14”.
It worked out perfectly to end it in the middle of the cabley part, and you could bind off and sew the sides together, fold it in half and do a 3 needle bind off, or kitchener the 2 sides together. I opted for the kitchener, see previous post as that is a whole adventure in itself.
And one more note, I still don't have a zipper, so there will be an anti-climactic photo sometime on an eighty-degree May day, of me wearing my finished Mariah!

With those general plans, I made up the specifics as I went along. I will try to give as complete details as I can, but please don’t ask me for stitch counts! First, I didn’t keep track of them, and figuring it out from the finished garment would be tedious or impossible. And second, I changed the stitch counts on the body of the sweater to accommodate my different gauge, so they would be meaningless to anyone except a person making size “somewhat bigger than large, but smaller than extra large”, and getting gauge of 4.63 SPI.
1. At the top of the arm, (don’t let this be dictated by where you are in the cable, it should be dictated by fact that the sleeve sits at the top of your arm.) you are supposed to stop the cable pattern and go back to the cable/rib pattern (as on the cuffs). Ignore this and keep knitting the big cable pattern. (My raglan measured about 6” at this point.)
2. I kept knitting, decreasing for the yoke, and doing the cable pattern, until my raglans measured 10” (measuring diagonally right up the raglan seam.)
AT THE SAME TIME: What I did for the back neck. I found that when I originally made this sweater, the neck opening at the hood was too large and caused the sweater to pull to the back and just feel really loose. I made 2 darts to bring the back more securely up around my neck. When the back length measured 18” (about 2 inches below the back neck) I knit about ¼ of the way across the back, k2 tog, place marker, sl 1, k1, psso knit across until you are the same distance on the other side, and do it again. This is just like some of the shaping in the pattern for the hood. Keep doing these decreases on the right side, and purl across on the wrong side for 2 inches, and you will take away approximately 20 stitches, or about 4”. If it still feels loose when you try it on, you can bind off the back neck to give it more structure. I bound off tightly, on the wrong side row, the last row of the yoke, and knit in pattern to the end. When I was coming back across on the right side (first row of the hood), I picked the stitches back up. Instead of picking up in the first stitch below the bind off row, I just picked up one thread, the bind off thread, to make it look neater on the wrong side, where it might be seen.
Back neck from the outside
Back neck from the inside.
AT THE SAME TIME: What I did for the front neck edge. When I had completed the rows that the pattern specified for the yoke, instead of doing the garter rows, I went straight across with a 2 x 2 rib, reminiscent of the rib at the bottom, but without the cables, for about 1.25”, then bound off that portion. Again, I did this to bring the neck in a little. It would have looked a little better if I hadn’t gone on quite so long, but say la vie.
Now, the raglan measured 10”, I had bound off the front rib, bound off the back neck, it “felt right” when I tried it on, like it was ready for a hood. At this point, some major magic happened. My raglan decreases had eaten up all of the sleeve up until exactly where the reverse stockinette stitches on either side of the big cable began. So now I started the hood. I knit 1 edge stitch (slip the first stitch of every row purl-wise, and knit the last stitch of every row.) 2 garter stitches, the rev. st.st of the cable, the cable (same cable- just as it was all the way up the arm and shoulder), knit across the back hood, and the same on the other side.
If you made the “darts” on the back neck to pull the neck in, you will want to add these stitches back in over the next few rows. Basically, you will want to come close to the same number of stitches as the pattern specifies for your size on the hood, keeping in mind that adding the cable will make your hood smaller than the original, so you might want to compensate. (The hood on the original was quite roomy, so if you have slightly less stitches, I think you would be fine.)
What I did to add the stitches back in, was knit 2, make one, repeatedly across the back, on two different rows. It made it a little ruffley, and this is one thing I would do differently, but I didn’t think it was bad enough to rip it out again. I would increase out gradually, by doing something like the darts in reverse.
href='http://photos1.blogger.com/img/259/2511/320/March 8 blog Mariah modifications 0065.jpg'>
Once I was going around on the hood, it was straightforward. I ignored the lower hood shaping directions, since I did the bind off/add back in thingie, above. I just knit it straight, with the cable on each side.
The only thing at this point, is to figure out where you will end the hood and make the cable symmetrical. I just knit and knit and decided I would worry about that when I got there. The finished hood is supposed to be 14”. When I reached 10”, I measured the hood and analyzed how long a cable repeat was. I figured I would either end it at the cable break, where you do the reverse St St rows, or in the middle between the break, so there would be one full portion of the cable between the break parts, centered on the back. I figured, between those 2 possibilities, I would be able to end it within a inch plus or minus of 14”.
It worked out perfectly to end it in the middle of the cabley part, and you could bind off and sew the sides together, fold it in half and do a 3 needle bind off, or kitchener the 2 sides together. I opted for the kitchener, see previous post as that is a whole adventure in itself.
And one more note, I still don't have a zipper, so there will be an anti-climactic photo sometime on an eighty-degree May day, of me wearing my finished Mariah!
posted by Emily at 10:22 PM
![]()


2 Comments:
thanks for posting this! I haven't picked up my mariah in a while.. but when I do, I'll have this post by my side. :D Although I don't understand half of it, as this is my first sweater. HA!!
Thanks for posting this, Emily! I'm at the top of the yoke now, and my stitch count is so off that I'm going to be doing some major improvising. Here's hoping I won't have to wimp out and do a collar instead! You're an inspiration. :)
Post a Comment
<< Home