Here we are, in the midst of Wacky January. I always think January is such a roller-coaster. The first week, I've got the adrenaline rush of the clean slate. So many project ideas built up in November and December that I didn't have time to work on. Christmas projects finished and gifted. The chance to start new things, things I really want to work on.
The next week, crash and burn. The realization that we are still at just the beginning of a long cold winter. Not as much progress made on the million mile long to-do list that I thought. So many projects and possibilities tends to paralyze me.
Then, we have a sunny day, and all of a sudden everything looks great again. And so it continues for the rest of January: grey days, feel like crap, sunny days, feel like a million bucks. Whew.
To combat Mother Nature and the hold she has over me, here is my strategy:
1. Just trying to work steady, and be content to check smallish things off my list.
2. Making very few big goals and breaking them down into bite sized chunks so I feel like I'm accomplishing something.
3. Going to bed earlier and getting up earlier to capitalize on the more energy-filled part of the day.
4. And on the very cold days, just hunkering in and not fighting to have more energy. Being happy doing puzzles, playing cards, and knitting, giving thanks for these little kids that are so cuddly and loving and still wanting to sit on my lap. (Even that gangly 8yo boy, who I'm afraid will ask me for the car keys any day now.)
Good Lord, I didn't mean to be so wordy this morning! Must be the sunshine.
How about a little show and tell:
.JPG)
Cute denim skirt.
Simplicity 9825. My effort to dress a little less "Hello, I'm going to be at home dyeing yarn and sewing today and just dropping the kids off at school in my jeans and a tee shirt uniform." The grey stretch denim is from
Vogue Fabrics in the South Loop. $1.99 a yard--can I get an
Amen, Sister?!
The double needle I used for the stitching actually cost more than the fabric! But worth it.
.JPG)
There's nothing like an Extra Wide Double Needle to make you feel like a bad-ass sewer! Double needle and light brown heavy topstitching on denim, with bar tacks thrown in here and there, are the necessaries for making denim look professional.
.JPG)
I added the triangle insert at the bottom, it's not in the pattern. I copied it from this
Boden skirt that I liked.
.JPG)
I'm so ready to wear my new skirt with
Beryl, which is humming right along!
.JPG) Here's a closer view of Beryl. That's black (vintage) Cotton Ease. Since I took the photo, I have sewn in both sleeves and knitted the neckband. I need to block the bottom; it is having rolling issues. I might need to sew some ribbon on the inside if blocking doesn't solve the problem. I also need to shorten the sleeves a little, cutting off the cuff and re-knitting down. But it is very close to the finish line.
Here's a closer view of Beryl. That's black (vintage) Cotton Ease. Since I took the photo, I have sewn in both sleeves and knitted the neckband. I need to block the bottom; it is having rolling issues. I might need to sew some ribbon on the inside if blocking doesn't solve the problem. I also need to shorten the sleeves a little, cutting off the cuff and re-knitting down. But it is very close to the finish line.
Another random project? How about these cuties.
.JPG)
Don't they look angelic?! In reality, the other 30 photos I took looked more like this one:
.JPG)
I used the pattern from
Grand Revival Designs (it's under "free patterns"). So cute! I made a couple of modifications. I cut my band wider, 9" instead of 5.25". I ended up lining the hats with Minkee too. I have never sewn with Minkee before, and let me tell you, that stuff shed like crazy. I have red and lavendar lint all over my sewing room. Not something you want to sew while wearing corduroy pants, either. Learned that the hard way. So, in other words, I didn't know how they were going to wear them without permanently linting their hair. So I just lined them. Makes them super warm, too. (Keeping this pattern on hand for future use with fleece--and you wouldn't have to line them, in that case.)
.JPG)
For the flowers, I just cut out 2 basic 5 petal flower shapes, sewed them right sides together leaving a little opening, and turned them right side out through the opening. Hand stitched the opening, then used a running stitch to gather up the center, and sewed a button over the gathered stitching.
I love these so much and I would really like one for myself. Is that so wrong? Cute and warm? And I happen to have an extra sparkley button. Just sayin.
.JPG) I recently told you about my sister's move out to California. A few months after she moved, she couldn't find a job yet and was having a hard time adjusting. Then, to add to an already difficult time, her sweet 14 year old kitty Dorrie, got sick and died.
I recently told you about my sister's move out to California. A few months after she moved, she couldn't find a job yet and was having a hard time adjusting. Then, to add to an already difficult time, her sweet 14 year old kitty Dorrie, got sick and died. .JPG)
.JPG) Ok, now I'm going to show you a ton of pictures of these gauntlets, because I love them so much! And if you were sitting here with me, I would make you try them on because they feel so good! I accosted a couple people at knitting last week who made the comments that they were almost "energizing" like those gloves that grab your wrists and feel warm and fabulous.
Ok, now I'm going to show you a ton of pictures of these gauntlets, because I love them so much! And if you were sitting here with me, I would make you try them on because they feel so good! I accosted a couple people at knitting last week who made the comments that they were almost "energizing" like those gloves that grab your wrists and feel warm and fabulous..JPG) I think the secret is the wrist shaping. It really makes them feel wonderful, as well as look great.
I think the secret is the wrist shaping. It really makes them feel wonderful, as well as look great. .JPG) The pattern is Elegant Gauntlets from The Purl Stitch by Sally Melville. Not your run-of-the-mill quick and easy fingerless mitts (I have made a lot of those and love those too!) These take a little longer, but the first part is mindless knit in the round stockinette for several inches, then a little interesting shaping, then a tiny fiddly thumb, then you're done! Great pattern. In fact, when I finally get around to posting my projects over in Ravelry, I'll give these an A+, or a 10, or a giant happy face, whatever you guys do over there.
The pattern is Elegant Gauntlets from The Purl Stitch by Sally Melville. Not your run-of-the-mill quick and easy fingerless mitts (I have made a lot of those and love those too!) These take a little longer, but the first part is mindless knit in the round stockinette for several inches, then a little interesting shaping, then a tiny fiddly thumb, then you're done! Great pattern. In fact, when I finally get around to posting my projects over in Ravelry, I'll give these an A+, or a 10, or a giant happy face, whatever you guys do over there..JPG)
.JPG)
.JPG)
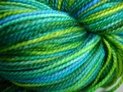
.JPG) I've been wanting to make a Koigu turtleneck ever since the Fall 2002 issue of Vogue Knitting. It has taken me awhile to collect enough dark blue and green Koigus (and I've thrown in a little
I've been wanting to make a Koigu turtleneck ever since the Fall 2002 issue of Vogue Knitting. It has taken me awhile to collect enough dark blue and green Koigus (and I've thrown in a little .JPG) Made even more fun, when tucked inside a colorful bag! (My own bag, made just like
Made even more fun, when tucked inside a colorful bag! (My own bag, made just like .JPG) And even more fun to carry on the go when tucked inside
And even more fun to carry on the go when tucked inside .JPG) A little color overload sure helps, when the days look like this.
A little color overload sure helps, when the days look like this. 
 A sweater from the thrift store, Grayson E. leather handles from
 .JPG) I felted the sweater by running it through the washer and dryer with some regular laundry, twice. I was initially disappointed at how much it shrunk up, but in the end it didn't really matter.
I felted the sweater by running it through the washer and dryer with some regular laundry, twice. I was initially disappointed at how much it shrunk up, but in the end it didn't really matter. .JPG) Here's a picture of the sleeve, cut apart. I loved the stripe and wanted to include it, so I used it for a pocket on the outside of the bag. (For the record, the bottom stripe that looks purple, is really a royal blue.)
Here's a picture of the sleeve, cut apart. I loved the stripe and wanted to include it, so I used it for a pocket on the outside of the bag. (For the record, the bottom stripe that looks purple, is really a royal blue.).JPG) My diary wouldn't be complete without showing a photo of my assistant, who had fun stealing the parts and dressing up with them any way she could!
My diary wouldn't be complete without showing a photo of my assistant, who had fun stealing the parts and dressing up with them any way she could!.JPG) Ta da!
Ta da!.JPG)
.JPG) The handles were the hardest part. I tried to to sew them by machine using a size 100 needle and the zipper foot, but the tension got messed up and they looked like a wreck on the inside. So I ended up sewing them by hand, using 4 strands of brown thread that matched the color of the stitching already on the handles. And some places I double sewed them, to make sure. It involved cursing, but it was worth it!
The handles were the hardest part. I tried to to sew them by machine using a size 100 needle and the zipper foot, but the tension got messed up and they looked like a wreck on the inside. So I ended up sewing them by hand, using 4 strands of brown thread that matched the color of the stitching already on the handles. And some places I double sewed them, to make sure. It involved cursing, but it was worth it!
.JPG)
.JPG)
.JPG)
.JPG)